How to Sew a Straight Seam (with the Right Seam Allowance)
A seam is just two pieces of fabric stitched together along an edge. That sounds simple, and it is, but the details matter more than most beginners expect. Getting the stitch line straight and placing it the right distance from the raw edge are skills you will use in every single project you ever sew. This guide walks you through both, step by step, and covers the most common mistakes so you can spot and fix them before they become habits.
What seam allowance means and why you should care
Seam allowance is the strip of fabric between the line of stitching and the raw edge. It exists for a reason: it keeps the seam from pulling apart under stress and gives you a little buffer if the fabric frays.
Most sewing patterns for garments use a 5/8 inch (1.5 cm) seam allowance. Quilting patterns almost always use 1/4 inch (6 mm). Home-dec projects often call for 1/2 inch (1.25 cm). The pattern will tell you which one it expects, and you have to match it, or the finished piece will come out the wrong size.
The seam allowance is measured from the needle to the edge of the fabric, not from anywhere else. Your machine almost certainly has markings engraved or printed on the needle plate to help you line up that edge. Take a moment right now to look at yours.
If you are sewing a basic practice seam to build the skill, start with 5/8 inch (1.5 cm). It is forgiving, it is the industry standard for garments, and it is what you will see most often in beginner patterns.
Getting your machine ready before you sew
Before fabric goes anywhere near the machine, spend two minutes on setup. A distracted start causes most beginner mishaps.
- Thread the machine correctly. Follow the numbered path printed on your machine, upper and lower. An incorrectly threaded machine skips stitches or bunches thread underneath.
- Wind and insert the bobbin. Check that it is seated firmly and the thread tail comes out the right way for your machine model.
- Set the stitch length. For woven fabrics like quilting cotton, calico, or linen, a stitch length of 2.5 mm works for most seams. For stretch or very lightweight fabric, you may need to adjust, but start at 2.5 mm.
- Sew a test line on scrap first. This is not optional. Always sew a few inches on a scrap of the same fabric before touching your actual project. Check tension on both sides of the scrap: the stitching should look identical on the top and the underside, with no looping or puckering.
- Check that the presser foot is down before you press the pedal. Forgetting this is the single most common beginner error. With the foot up, the tension discs are open and thread feeds freely; the result is a tangled mess under the fabric.
Needles matter too. For most beginner projects in medium-weight cotton, a size 80/12 universal needle is a safe choice. Replace the needle at the start of any new project. A dull needle drags on fabric and makes a slightly popping sound as it pushes through.
How to sew a basic straight seam
Here is the full process for sewing a single, straight seam between two pieces of fabric. Repeat this until it feels automatic.
Prepare and pin the fabric
Place your two pieces of fabric with their right sides facing each other. You want the good-looking sides pressed together, facing in, so that when you unfold the seam the right sides face out. This is called "right sides together" and you will see it in every pattern you ever use.
Pin along the edge you are about to sew, placing pins perpendicular to the edge (pointing toward you as you hold the fabric). Space them about 3 to 4 inches (7.5 to 10 cm) apart for straight edges. Do not pin parallel to the stitching line; pins set that way are awkward to remove and can cause the stitching to swerve.
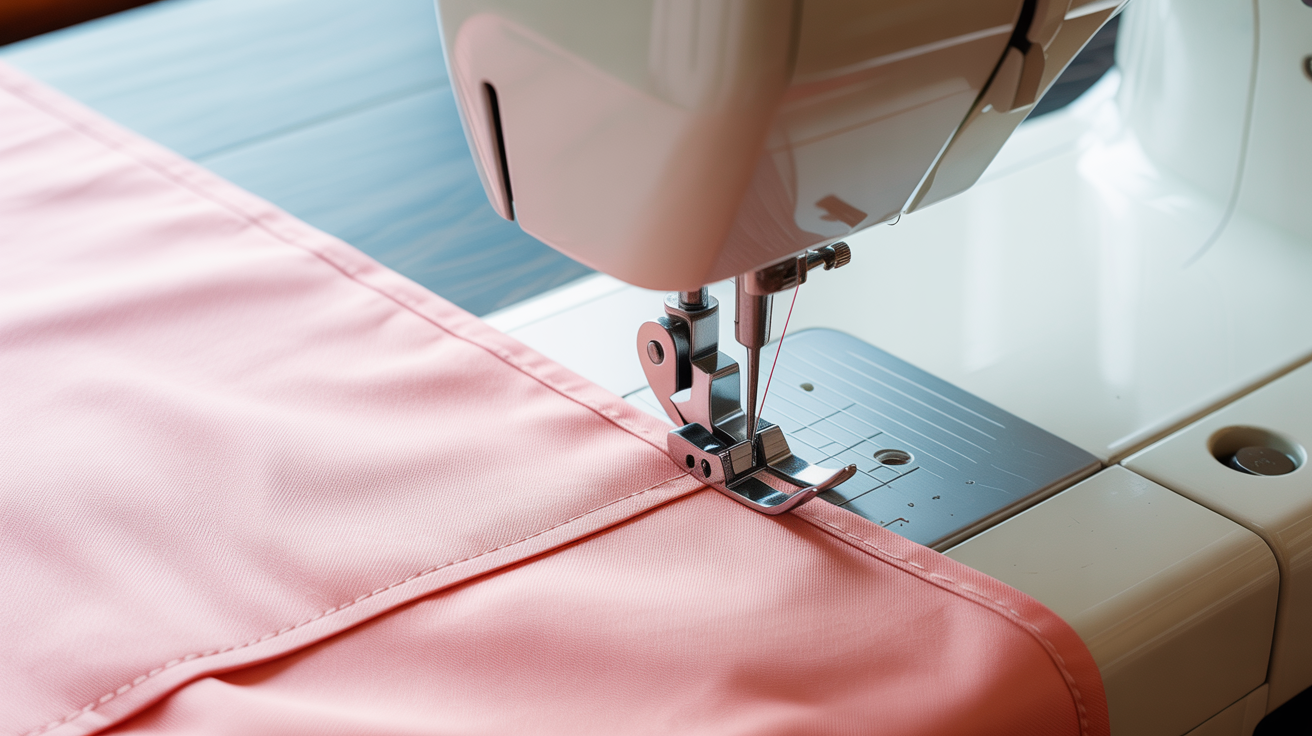
Position the fabric under the needle
Slide the fabric under the presser foot so the raw edge aligns with the appropriate guide mark on the needle plate. For 5/8 inch (1.5 cm) seam allowance, line up the edge with the 5/8 inch mark.
Lower the presser foot lever. This is the small lever at the back of the presser foot assembly. Lowering it engages the tension and holds the fabric in place. Now pull the top thread and bobbin thread gently toward the back of the machine so they are out of the way.
Backstitch at the start
Before sewing forward, take 3 to 5 stitches in reverse to lock the thread at the beginning of the seam. This is called backstitching. On most machines you hold a button or lever while the machine runs. Without it, the stitching will unravel from the end as soon as you handle the fabric.
Sew the seam
Begin sewing forward at a pace you can control. Your job is to keep the raw edge of the fabric lined up with the guide mark, not to watch the needle. Look ahead at the edge and the mark, not at the spot where the needle is entering the fabric. This shift in focus makes straight seams much easier.
Remove pins as you approach them, not as you stitch over them. A pin can deflect the needle, bend it, or break it, and a broken needle becomes a fast-moving projectile.
If you need to correct the direction of a curved or slightly off-line seam: stop with the needle down in the fabric, lift the presser foot, pivot the fabric to the new angle, lower the foot, and continue. For a straight seam this should rarely be necessary, but it is the right technique.
Backstitch at the end
When you reach the end of the seam, backstitch again 3 to 5 stitches to lock the thread. Stop sewing, raise the needle to its highest position using the handwheel, raise the presser foot, and slide the fabric out toward the back-left of the machine. Cut the threads, leaving tails of at least 4 to 5 inches (10 to 12 cm) so they do not pull back through the machine.
Press the seam
Pull out all the pins. Take the sewn pieces to the iron. Pressing seams open or to one side makes a real difference to how flat and professional the finished piece looks. A finger-pressed seam is better than nothing, but an iron sets the stitching properly and makes the next construction step far easier.
Common problems and how to fix them
Even experienced sewers have off days. Here is a quick-reference table for the most common straight-seam problems.
| Problem | Most likely cause | Fix |
|---|---|---|
| Stitches looping under the fabric | Upper thread not threaded correctly, or presser foot was up while threading | Re-thread the upper path with the foot down |
| Stitches skipping randomly | Dull or bent needle | Replace the needle |
| Fabric puckering along the seam | Tension too tight, or pulling the fabric while sewing | Back the tension off one step; let the feed dogs move the fabric |
| Seam curves when it should be straight | Watching the needle instead of the edge guide | Keep eyes on the edge mark, not the needle entry point |
| Threads tangling in a nest at the start | Bobbin area not threaded, or thread tails not pulled back | Re-seat bobbin; always hold thread tails behind foot for the first 2 to 3 stitches |
| Seam allowance is inconsistent | Not keeping the fabric edge aligned with the guide | Slow down; use a piece of masking tape as an extra guide if needed |
Masking tape is genuinely useful for beginners. If your machine's guide marks are hard to read, stick a strip of tape at exactly 5/8 inch from the needle, raised slightly so the fabric slides under it. It gives you a tactile edge to follow and makes drift obvious immediately.
Keeping the seam allowance consistent along the full length
Beginners often start well and then drift. The seam allowance might be 5/8 inch at the top and end up closer to 1/2 inch or 3/4 inch by the bottom. A quarter-inch drift over a side seam can throw off a garment's fit noticeably.
A few habits that help:
- Slow down at the start and end. Most drift happens in the first and last 2 inches.
- Do not let long fabric hang off the back of the table. It pulls and tilts the piece. Support it with your non-dominant hand.
- Sew at a speed where you can react. The pedal on most machines is pressure-sensitive: the harder you press, the faster it goes. Find a moderate pace you can sustain.
- Check halfway. Stop mid-seam, needle down, and look at where the raw edge sits relative to the mark. Correct before continuing.
Once you finish a seam, finishing the raw edges keeps fraying in check over time. On calico and quilting cotton, raw edges fray faster than you might expect after a few washes.
When seam allowances differ between patterns
You may eventually work from two patterns at once, or use pattern pieces from different sources. A garment pattern at 5/8 inch and a bag pattern at 1/2 inch will both come out wrong if you forget which is which.
Write the seam allowance on each pattern piece in pencil before you start cutting. It takes thirty seconds and saves a ruined project.
If you ever trace or copy a pattern, add the seam allowance to your traced copy right then, before the tracing gets shuffled with other papers. Professional pattern companies include the seam allowance on the printed pieces; vintage patterns and some European patterns do not. Read the instructions before you cut.
For practice seams on scrap fabric, seam allowance barely matters. But the moment you are cutting real fabric for a real project, the seam allowance is part of the math. Cut fabric with the seam allowance included, stitch at the stated distance from the edge, and the finished size comes out right.
Frequently asked questions
What stitch length should I use for sewing a basic seam?
For woven fabrics at medium weight, 2.5 mm is a reliable starting point. Lighter fabrics do better at 2 mm. Thicker fabrics like denim or canvas may need 3 to 3.5 mm. Always test on a scrap from the same fabric before sewing your project pieces.
Can I sew over pins or should I always remove them first?
Remove pins before you reach them. Sewing over a pin can deflect the needle slightly (causing a crooked stitch), bend the needle, or break it. A broken needle can send a fragment toward your eyes. It takes a second to pull each pin out and that second is worth it.
My seam looks fine from the top but there are loops on the underside. What is wrong?
Looping on the underside almost always means the upper thread tension is too loose, or more often, the upper thread is not seated correctly in the tension discs. Re-thread the upper path from the beginning with the presser foot DOWN (the foot position opens and closes the tension discs). If loops appear on the top instead, re-seat and re-thread the bobbin.
What does "right sides together" mean?
The right side of fabric is the side intended to face outward in the finished piece. It is usually the printed or shinier side. When you sew two pieces right sides together, you are sandwiching the good sides face to face so the seam ends up on the inside once you open the fabric out.
Do I always need to backstitch at the start and end of a seam?
For almost any seam that will be handled, washed, or stressed, yes. The exception is when another line of stitching will cross over the end of your seam at a seam intersection, which effectively locks it. But when in doubt, backstitch. It takes three seconds and prevents a seam from unraveling at the worst possible moment.