How to Do a Backstitch by Hand for Strong Seams
If you need a hand-sewn seam that will hold up to real use, the backstitch is what you want. It forms a near-continuous line of thread on the front of the fabric and creates a chain-like lock on the back, which is why tailors have relied on it for centuries. A running stitch is faster, but it gives if you pull the thread. A backstitch does not budge. Once you feel the rhythm of going back before you go forward, the motion becomes almost automatic.
This guide walks you through the backstitch from threading your needle to tying off, with tips for common beginner mistakes along the way.
What you need before you start
You do not need much. For hand sewing a seam in quilting cotton or a light linen, a standard sharps needle in size 7 or 8 works well. A longer needle (size 5 or 6) is easier to grip if your fingers are still building calluses. Use a thread weight that matches your fabric: all-purpose polyester or cotton thread (around 50 weight) is the right choice for most beginner projects.
Cut your thread no longer than 45 cm (about 18 inches). Longer thread knots and tangles before you finish the seam, which is frustrating. Thread the needle and tie a simple knot at the end. If knotting is new to you, the guide on how to thread a needle and tie a knot that holds covers exactly that.
Have a small pair of scissors within reach and a thimble if you own one. A thimble protects the pad of your middle finger when you push the needle through multiple layers. It feels awkward at first, but it prevents sore spots on long seams.
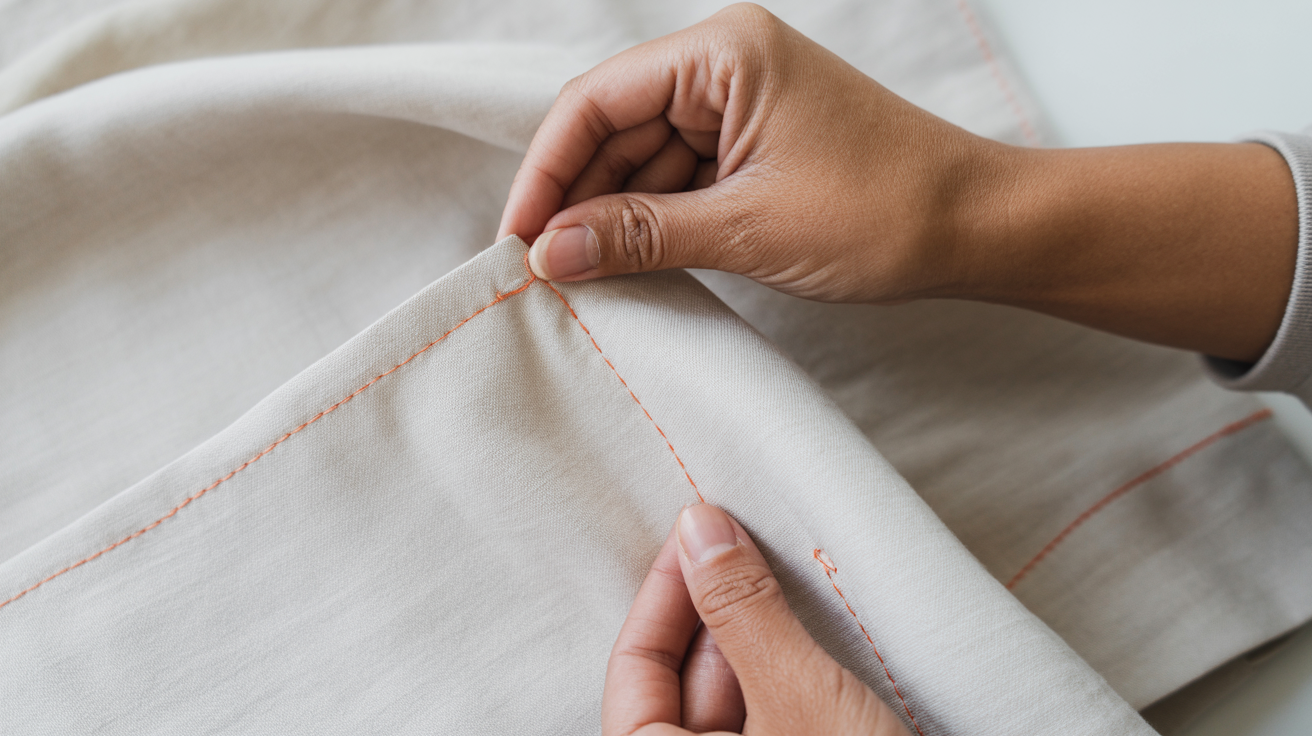
How to sew a backstitch, step by step
Work on a flat, firm surface. Pin or hold your fabric layers together so they do not shift while you stitch.
- Push the needle up through both fabric layers from the wrong side. Pull the thread all the way through until the knot catches against the fabric.
- Insert the needle back down through the fabric about 3 to 4 mm (1/8 inch) BEHIND where the thread came up. Pull through.
- Bring the needle back up through the fabric about 3 to 4 mm AHEAD of where the thread first emerged. Pull through.
- Insert the needle down again at the point where the previous stitch ended, going backward to meet it. Pull through.
- Come up again 3 to 4 mm ahead. Repeat.
Each time you push the needle down, you go back to fill in the gap. Each time you bring it up, you move forward. That backward-then-forward motion is the whole technique. On the right side of the fabric the stitches butt up against each other and look almost like a line of machine stitching. On the wrong side you see long overlapping loops.
Keep your stitch length consistent. Uneven stitches are a normal beginner thing and they do not affect strength, but consistent stitches look tidier and make it easier to hold a straight seam line. A light pencil or chalk line on the fabric is a real help while you are learning.
Common mistakes and how to fix them
Thread twisting or knotting mid-seam. This usually means the thread is too long. Start a new length at 45 cm maximum. You can also dangle the needle and let it spin freely to untwist the thread every 20 or 30 stitches.
Stitches pulling the fabric into a pucker. You are pulling the thread too tight after each stitch. After you draw the thread through, give a gentle, firm pull just until the thread lies flat against the surface. No more.
Gaps between stitches on the right side. You are not going back far enough when you insert the needle. The needle should go down exactly at the end of the previous stitch. Place your fingernail at that point to mark it before you insert the needle.
Needle hard to push through. This often means the needle is too large for your thread and fabric, or you are hitting a pin. Remove pins as you approach them rather than stitching over them. Sharp needles also make a real difference; a needle that has caught on a pin can develop a tiny burr that drags on every stitch. Discard bent or blunted needles.
When to use a backstitch instead of other stitches
The backstitch is not always the right tool. Here is a quick comparison of the most common hand stitches for beginners:
| Stitch | Strength | Speed | Best use |
|---|---|---|---|
| Backstitch | Very strong | Slow | Seams, repairs, closing stuffed items |
| Running stitch | Moderate | Fast | Basting, gathering, light seams |
| Slip stitch | Low (nearly invisible) | Moderate | Hemming, closing an opening invisibly |
| Whip stitch | Moderate | Moderate | Joining two edges, felt projects |
Use a backstitch when the seam needs to resist pulling: closing the opening on a cushion or stuffed toy, repairing a split seam in a pair of trousers, or sewing in a zip by hand. If you just need to temporarily hold two pieces together before machine sewing, a running stitch is faster and easier to remove. The guide on how to sew a running stitch and when to use it explains the differences in more detail.
For a broader look at which stitches belong in your beginner toolkit, see basic hand sewing stitches every beginner should learn.
How to end your backstitch seam securely
A seam that finishes with a loose thread end will unravel. Here are two ways to tie off that actually hold:
- Loop knot on the back. After your last stitch, bring the needle to the wrong side of the fabric. Pass the needle under the last stitch without going through the fabric, then bring it through the loop that forms before you pull it tight. Repeat once. Trim the tail to about 1 cm (3/8 inch).
- Tiny backstitch knot. Take two or three very small backstitches (barely 1 mm each) in the same spot on the wrong side. These lock the thread end without a bulky knot. Trim close.
Do not simply tie a granny knot over the fabric surface. It sits proud and can catch on things or work loose over time.
Practicing until the motion feels natural
The backstitch is one of those things that clicks after about 20 minutes of actual stitching. Cut a 15 by 15 cm (6 by 6 inch) piece of quilting cotton, layer it with another piece, and stitch a straight line from one side to the other. Check the front: do the stitches meet end to end? Check the back: do you see the overlapping loops? Then stitch a curve, which is harder because you have to take slightly shorter stitches to keep the line smooth around bends.
Calico (unbleached cotton muslin) is a good practice fabric. It is inexpensive, easy to needle, and does not fray aggressively while you handle it. Stay away from very slippery fabrics like satin or very thick fabrics like denim until the motion is second nature.
Frequently asked questions
Is a backstitch really as strong as machine stitching?
A well-done backstitch is close to machine stitching in strength for most hand-sewing tasks, though it is slightly less consistent because stitch length varies by hand. For high-stress seams, like the crotch seam of jeans, a machine stitch is still better. For repairs, cushion closures, and light seams in a hand-sewn project, a backstitch holds reliably.
How long should each backstitch be?
Aim for stitches of 3 to 4 mm (about 1/8 inch) for normal seam work. Shorter stitches give more strength and look neater; longer stitches are faster but slightly less secure. For very thick fabric, a stitch of 5 to 6 mm is easier to manage and still holds well.
What thread should I use for hand backstitching?
All-purpose thread (50 weight cotton or polyester) is right for most projects. Use a thread colour that matches your fabric if you want the stitching to blend in. For repairs on heavy fabric like denim or canvas, upholstery thread or button and carpet thread gives extra strength because it is thicker and tightly twisted.
My stitches look fine on the front but messy on the back. Is that normal?
Yes, completely normal. The back of a backstitch always looks looped and overlapping because the thread doubles back on itself. That is exactly what creates the strength. As long as the front looks like a neat line of stitches, your technique is correct.
Can I use a backstitch to repair a seam that has split open?
This is one of the best uses for a backstitch. Open the seam slightly beyond the split so you can start and end in solid, intact stitching. Sew a line of backstitches through both layers, overlapping the original stitching by at least 1 cm (3/8 inch) on each side. Tie off securely on the wrong side. The repaired section will often be stronger than the original seam.