How to Mend a Tear and Fix a Hole by Hand
A torn seam or small hole does not mean a garment is finished. With a needle, thread, and about fifteen minutes, you can close most damage so it holds through regular wear. This guide walks through the tools you need, which stitch to use for which repair, and how to finish off so the thread stays put.
Before you start, test your thread color on a scrap of the fabric or inside a hidden seam. A close match disappears; a poor match draws the eye straight to the repair.
What You Need Before You Start
You do not need a kit full of notions. For basic mending, gather:
- Needle suitable for the fabric weight (a sharps needle works for most wovens; a ballpoint for knits)
- Thread that matches the fabric color as closely as possible
- Small scissors or a seam ripper
- Pins to hold the fabric in place while you work
- Iron for pressing seams flat before and after (use a press cloth on delicate fabrics)
If the tear is along a seam, you may also want a seam ripper to open a few extra stitches on either side so you can re-sew on stable fabric rather than frayed edges.
Learning to thread a needle and tie a knot that holds is the first skill to have in place before any mending job. A knot that slips undoes all your work.
How to Repair a Ripped Seam by Hand
A seam that has pulled open at a stress point is one of the most common repairs. The original fabric is intact; only the stitching has failed.
Prepare the Area
Open the damaged section another half centimeter on each side with a seam ripper. This exposes fresh, unfrayed thread holes to sew through. Press the seam allowances flat with an iron so the edges lie in position while you work.
Choose Your Stitch
A backstitch is the right choice for seam repairs. It produces a continuous line of thread that interlocks with itself, so if one loop breaks, the rest holds. To backstitch:
- Knot your thread and bring the needle up through both layers of fabric, one stitch length ahead of where the seam broke.
- Insert the needle back into the fabric at the start of the gap, going backward one stitch length.
- Bring the needle up one stitch length ahead of where it went in.
- Repeat, always sending the needle backward to the end of the previous stitch.
Keep stitches even: roughly 3 to 4 mm works well for most fabrics. Overlap the existing machine stitching by about 1 cm on each side to anchor the repair into solid thread.
Finish Off
After overlapping the existing stitching, take two or three small stitches on top of each other in the seam allowance, then pass the needle under the last loop before pulling tight. Trim the thread close. Press the seam flat from the right side.
If you want a more thorough overview of which stitches suit which jobs, the guide to basic hand sewing stitches every beginner should learn covers the full range, including whip stitch and slip stitch for different repair situations.
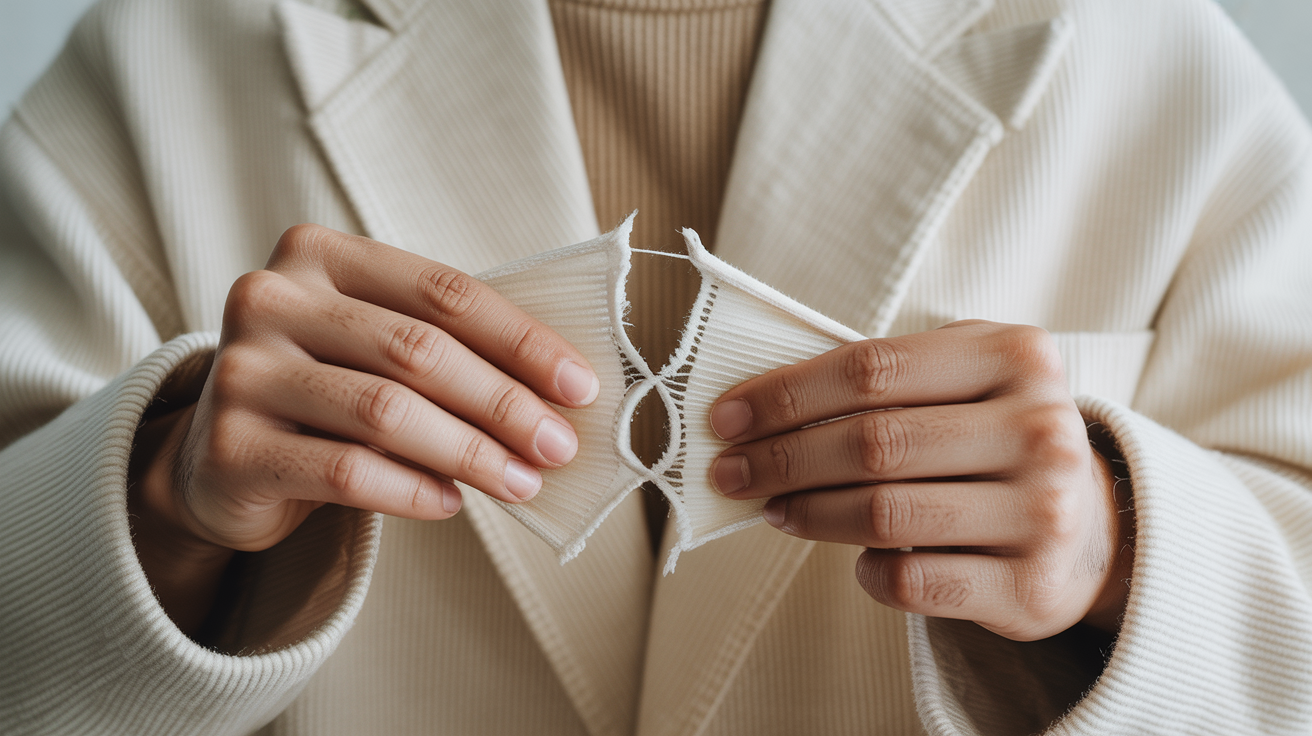
How to Fix a Hole in Woven Fabric
A hole with no seam nearby needs a different approach because there is nothing to close against itself. The goal is to fill the gap with new thread, supported by the fabric around it.
Small Holes (Under 5 mm)
A simple darning technique works well. Thread your needle with matching thread and bring it up just outside the hole. Work parallel lines of running stitch back and forth across the gap, catching a few threads of fabric on each side. Once you have covered the hole in one direction, rotate ninety degrees and weave the needle over and under those first threads to create a woven patch. The interlocked threads support each other.
Larger Holes or Worn Thin Areas
For a hole bigger than about 1 cm, or a spot that has worn completely through, a fabric patch gives more strength. Cut a piece of matching or complementary fabric slightly larger than the hole, position it behind the garment on the inside, and pin it flat. From the right side, use small running stitches around the perimeter of the hole, catching both layers. Then work rows of parallel stitching across the hole to anchor the patch through to the face fabric.
A running stitch is the foundation of this technique. The guide on how to sew a running stitch and when to use it explains length, tension, and common starting mistakes.
Mending Knit Fabrics
Knit fabrics present a separate challenge: they stretch, and a rigid stitch will pop on the first wear. A few adjustments help.
Use a ballpoint or jersey needle, which slides between knit loops rather than piercing them. Thread choice matters too: a thread with some give, or a strand of woolly nylon, handles stretch better than standard polyester on a very stretchy knit.
For small holes in a T-shirt or similar, a tiny whip stitch around the perimeter of the hole draws it closed without bunching. Work loosely. Pull the thread just enough to bring the edges together, not so tight that the fabric puckers. Test the area gently before wearing to confirm the stitch has room to flex.
For ladder runs in knitwear, the repair is more like a crochet hook rescue than a standard mend: a yarn needle and matching yarn can ladder stitches back up the column if you work slowly from the bottom of the run upward.
Quick Reference: Which Stitch for Which Repair
| Repair type | Best stitch | Notes |
|---|---|---|
| Ripped seam | Backstitch | Overlap existing stitching by 1 cm on each side |
| Small hole in woven | Darning (running stitch grid) | Keep tension loose; fabric should lie flat |
| Large hole or worn area | Running stitch over a patch | Patch goes on inside; stitch catches both layers |
| Hole in knit | Whip stitch | Work loosely to allow stretch |
| Fraying edge with no seam | Whip stitch or blanket stitch | Encases the raw edge |
| Decorative or visible mend | Running stitch in contrast thread | Visible mending intentionally shows the repair |
Frequently Asked Questions
What thread should I use for mending? Match the fiber content if you can: cotton thread for cotton fabric, polyester for synthetics. Color match matters more than fiber match for most repairs, but polyester thread on a natural fiber garment can create a stiffer feel over time. A standard all-purpose polyester thread handles most repairs adequately.
How do I keep the repair from showing on the outside? Work with small, even stitches and thread that closely matches in color and weight. On the right side of the fabric, use a slip stitch or ladder stitch for seam repairs along hems or side seams because only tiny thread dots show. Backstitch is stronger but more visible, so reserve it for seam allowances where the stitching is hidden inside.
My thread keeps knotting as I sew. What is wrong? Thread length is often the culprit. Cut your thread no longer than about 45 cm (roughly from your fingertip to your elbow). Longer thread has more time to twist and tangle as you pull it through. Waxing the thread by running it over a beeswax block also reduces friction and tangling.
How do I repair a tear that is not along a seam? A mid-fabric tear with two raw edges needs to be brought together before stitching. Pin the edges so they just meet without overlapping, then use a herringbone stitch or a catch stitch worked across the gap from the inside of the garment. This distributes the strain across a wider area than a single line of stitching.
When is hand mending not enough? If the fabric around the tear has weakened significantly, hand stitching through fragile material will tear out again quickly. In that case, a fusible interfacing patch ironed to the back of the fabric first gives the needle something solid to pass through. For structural stress points like crotch seams or underarm seams on frequently worn garments, machine stitching with a reinforcing zigzag is a more durable long-term fix.